- Photo credit Kristoffer Triplaar
A dear friend is getting married. Said friend asks you to bake her wedding cake. In a fit of bravado (or madness) you say, “Of course!” After all, you can bake pretty well. And lots of people have done it, right? How hard can it be?
Well … we’re not going to lie. It is kinda hard. But if you’re committed and meticulous, you can absolutely bake a wedding cake. And if you’ve already mastered layer cakes, you may not find it particularly difficult at all — just a lot more time-consuming.
Now, I thought myself a pretty solid baker before taking on this project with the bride, my dear friend Julia, last winter. My cakes had always turned out pretty well. But the level of precision required to turn out a beautiful, tasty, upright wedding cake put all my previous efforts to shame.
You have to measure ingredients precisely. You need to really get to know your oven and monitor temperatures closely. You need to buy tools (luckily, pretty inexpensive ones) that you probably didn’t know existed. You have to plan ahead. You have to eat a lot of practice cake (oh, darn). You have to learn not to panic.
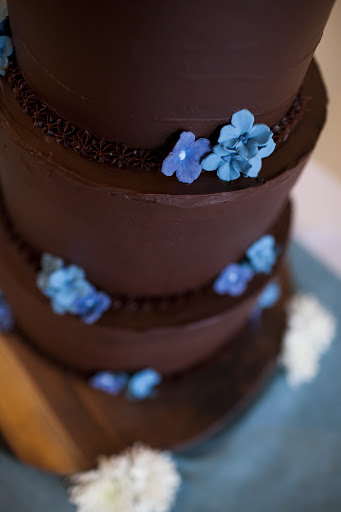
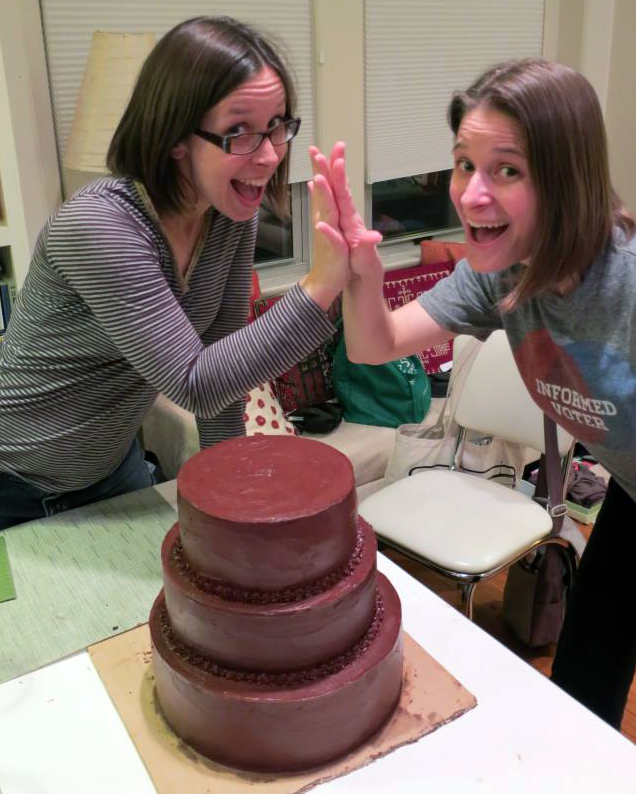
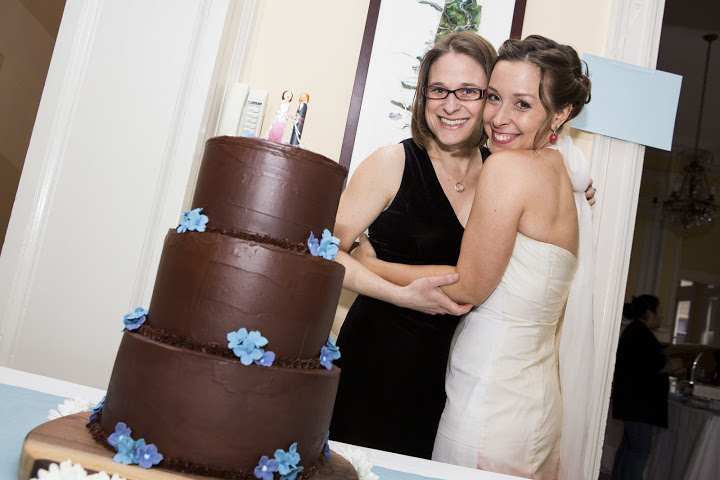
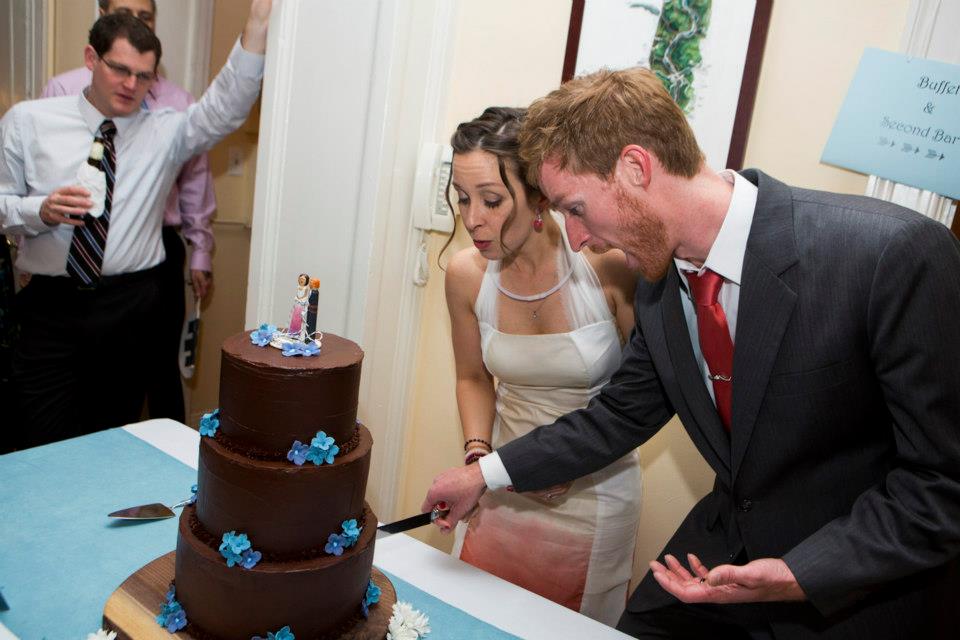
Julia and I learned all those things — the hard way, in some cases — and pulled off a spectacular and stunning three-tier cake. Chocolate with chocolate buttercream frosting, with salted peanut butter frosting between the inner layers (each round tier made up of three layers: 8, 10 and 12 inches). And while I’m a pretty modest person at heart, I am unabashedly proud of that cake.
To be clear, we’re not going to attempt to teach you how to make a wedding cake with this post. There are tons of books and resources out there to walk you through it; we particularly liked Wedding Cakes You Can Make: Designing, Baking and Making the Perfect Wedding Cakeand Sky High: Irresistible Triple-Layer Cakes, the source of our chocolate batter recipe (we cobbled our frostings together from a few different sources). And we relied heavily on Deb Perelmen’s experience, chronicled in multiple posts over at Smitten Kitchen, as well as the great tips in the readers’ comments.
Instead, we’re going to share things we wish we had understood better when we started that make planning and execution a bit smoother.
And before we start, just because it can be confusing: Below we’ll refer to layers, when talking about baking, and tiers when talking about cake construction. A wedding cake is made up of multiple tiers of different sizes. A single tier is made up of multiple layers.
Ready? Here goes!
Find A Recipe — For The Right Sized-Cake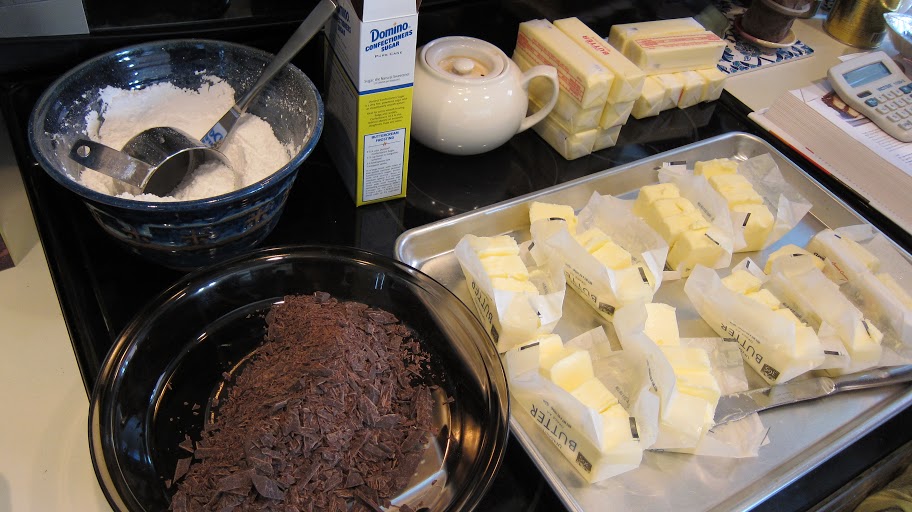
Naturally, pans of different sizes have different volumes, and round and square pans do, too. Julia and I made things hard for ourselves by baking a square cake recipe in a round pan. We’re warned against trying to fit square pegs in round holes for a reason, folks. It worked, but it involved a lot of confusing conversion calculations that just made things harder than they needed to be. Do yourself a favor and find a recipe for a cake of the shape and sizes you want.
Know Your Oven
If you don’t already own an oven thermometer, get one. A five- or 10-degree difference turns out to be a big deal. It can make your cake lopsided, fall, undercook, overcook — all bad news for making a perfect cake. You’ll never know if and how much you need to adjust your temperature settings without one of these babies.
Get A Kitchen Scale, And Use It
You want each of your layers in each tier to be exactly the same, which means you need to weigh your ingredients rather than rely on the standard “cup” measurements. If your recipe is written in cups, measure every ingredient out, weigh it and write it down on your recipe (and don’t forget to tare your receptacle!). Those measures will ensure that every single layer you bake contains precisely the same amount of every ingredient. We found it easiest to weigh in grams.
 Practice, Practice, Practice
This is no secret — any book or source you find will tell you this — but it bears repeating. No matter how good a baker you are, your wedding cake should notbe the first multi-layer, multi-tier cake you’ve ever made. You’ll learn things you need to know only by doing it ahead of time. Plus, bonus! You’ll have lots of extra cake to eat and share (and your friends, neighbors and/or colleagues will love you).
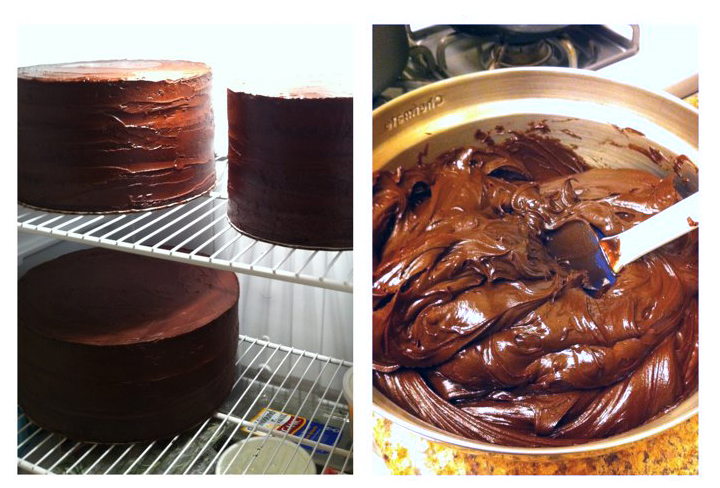
Freeze, Freeze, Freeze! Really!
This will save you tons of time, by letting you chip away at your layers in advance. Yes, it may sound nuts to freeze your layers ahead of time. We didn’t believe it, either. But it’s true: if you wrap your layers individually in plastic wrap (use lots!), after each one is completely cooled, it will taste and feel delicious. No one will know. And when it’s time to construct your tiers, you’ll find the layers are much easier to work with when they’re still a bit cold.
You should also experiment with freezing your frosting. I tested this with our practice cake and our chocolate buttercream frosting, and once thawed, it was perfect. This probably won’t work with all recipes, but it’s worth trying out. Making a wedding cake’s worth of frosting in advance is a huge time-saver.
Get Some Tools
These are pretty basic cake-baking tools, but we didn’t know about many of them before we started.
Flower nails: More nail than flower, these little guys are about an inch long but with a fat head, a bit bigger than a quarter. They’re essential for the even rising and baking of larger cake layers because they conduct and distribute heat through what would otherwise come out as a gooey, undercooked center. When we forgot to use them, our layers weren’t too pretty. (Not that we didn’t enjoy eating them!)
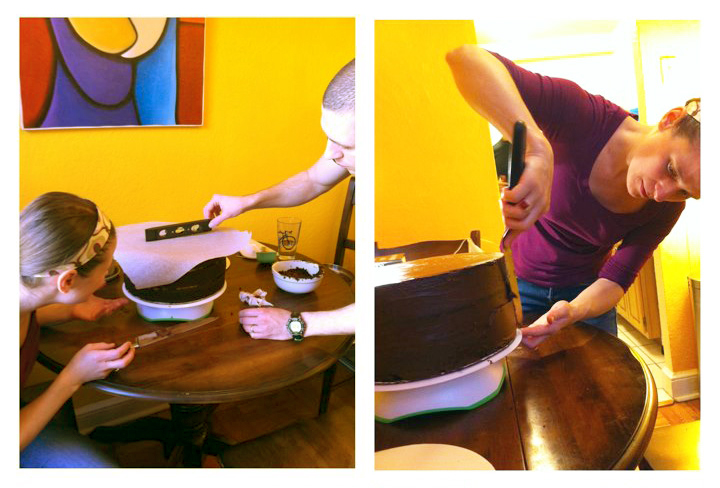
Cake strips: Partner-in-crime to the flower nail, a cake strip is about an inch wide and comes in various lengths. It insulates your large cakes so that the edges don’t burn while the center is still firming up. You soak it in water, wrap it around the outside edge of the pan, and pin it in place. Magic! We didn’t know about these. YOU WANT THESE.
Parchment Paper: You may already stock this in your kitchen, but if not, we recommend it highly for keeping the cakes intact as you coax them out of the pans. We buttered the bottom of the pan; cut parchment paper in the shape and size of the pan; stuck the flower nail through the center of the parchment paper so that the flat side of the nail head was down and the nail part pointed up. Then we buttered the top of the parchment paper, the sides of the pan, and the flower nail.
Cardboard cake rounds: These come pre-made in all sizes and they’re essential for making layer cakes. 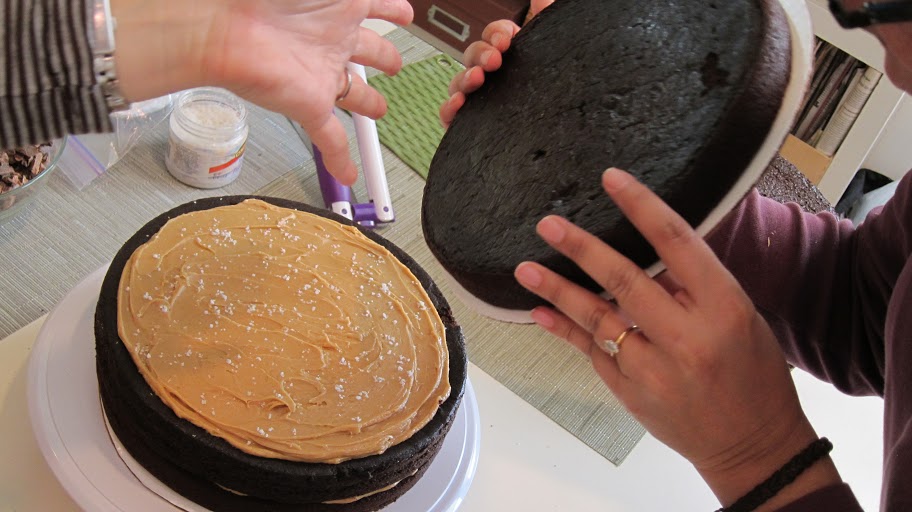 Here’s why:
- They keep each layer nice and tidy for freezing, and enhance maneuverability when you pull all the layers out for thawing, frosting and assembly on the big day.
- After all the pretty photos are taken and the ceremonial first slice is cut, wedding cakes are whisked away and disassembled into their individual tiers before slicing. You want the bottom of each tier to retain its cardboard round as you stack it on the tier below, so that each tier can be “easily” un-stacked. (This is actually a little stressful, but with a steady hand and a spatula, it works!)
- As for how to use them: After the cake pan comes out of the oven and cools for 10 minutes on a wire rack, put the cake round over the top of the cake (you may want to poke a hole in the center of the cardboard to accommodate the tip of the flower nail). Then place your cooling rack over the cardboard round and deftly flip the cake! With the pan now upside down on the wire rack, shimmy the pan off carefully, remove the parchment paper and the flower nail, and allow your cake to cool completely before wrapping it in a million layers of saran wrap and foil for freezing.
- If you’ve done this, each layer will be on a cake round when you start constructing your tiers. You’ll need to toss all but one of the rounds, because you want only one round per tier: on the bottom, like this. So when you thaw the layers for your tier, keep the cardboard round on one of them. To remove the cake rounds from the other layers, use dental floss or fishing line held taut between your fingers to saw along the bottom of the cake.
Turntable: You’ll wonder how you ever frosted a cake before owning this wondrous gadget. With the right frosting tools, the turntable helps you get an even finish on the sides, top and edge of your cake tiers.
- Hint: we frosted each multi-layered tier separately on the turntable, and transported the tiers to the venue separately before stacking them. This required us to take a bit of frosting, frosting bags and the “long dowel” (see below) to the venue, because you’ll want to plug up the unsightly gap between the tiers with some sort of decorative frosting technique.
- Hint: Bring extra frosting to the venue with you – when you’re disassembling the tiers, the upper tier is likely to take some of the frosting off the top of the tier below it. You can use your extra frosting to “patch” up the top.
 Frosting Tools: If you’re using a buttercream frosting, get some nice flat metal spatulas in a couple of sizes, and a plastic tool with a straight or a comb edge, depending on the look you’re going for. You’ll want to get some frosting bags and tips to do some piping — if not on the edge or top of the cake, then to seam up the tiers. If you don’t want to use frosting to seam the tiers, you may be able to get away with using another kind of decoration, like edible cake decorating pearls or gum paste decorations, etc. (we bought the gum paste flowers you see on this cake from an Etsy vendor). If you want to frost your cake with fondant, well, that’s a beast we know nothing about!
Wooden Dowel Rods: Inserting several of these into each tier helps support the tier that sits on top of it. (Tiers are heavy!) You’ll need them for every tier except the top tier (unlike the lower tiers, it’s not supporting anything). Working with them is not as mysterious as it sounds:
- When your bottom-most tier is all frosted and ready to go, take the next biggest pan, turn it upside down, and smush it ever so gently into the frosting right in the center. This marks your target for laying down the next tier (it will give you an outline that looks like this).
- Then take a dowel and push it down into the center of your cake. Mark where it meets the top of the cake with a pen, then remove the dowel and cut it at your mark. Then cut four or five more to exactly the same length. Then insert your cut dowels into the cake – one at the center, and the rest an inch or so inside the perimiter of the “pan marking” you made in the frosting. It’s important all your dowels are the same length – this will help keep the tier above level.
- You do not insert any small dowels into the top tier. Remember, it’s not supporting anything above it.
- When you finally assemble all your tiers, you will take one very long dowel and cut it at the height of your fully assembled cake. Sharpen one end and slowly insert it, from the top, through the entire masterpiece. It really does work — gently turn it as you push it through each of the cardboard rounds separating the tiers. Cover the tiny hole in the top of your cake with frosting and/or your cake topper!
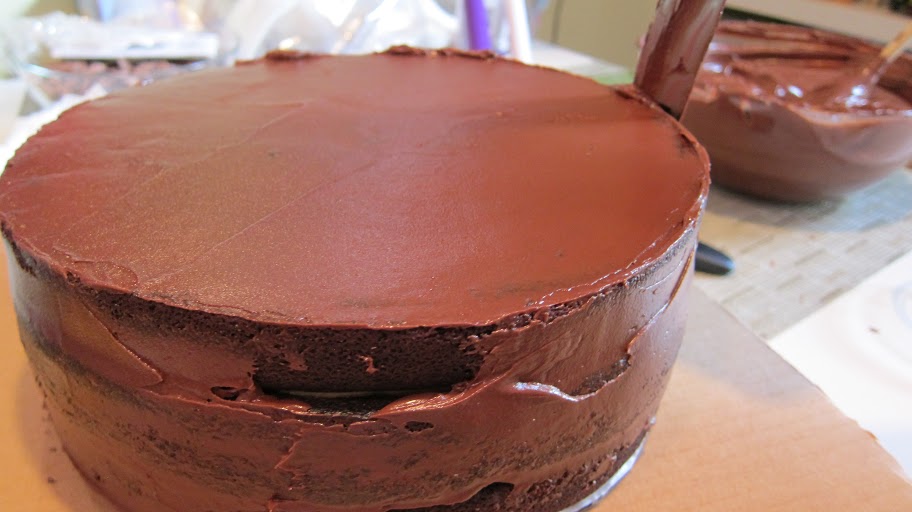 Don’t Skip The Crumb Coat!
A crumb coat is a first, thin layer of frosting applied to your assembled tier before the final coat. It’s a bit like a primer on your wall — it catches all those imperfections and pesky crumbs that would otherwise end up marring your lovely frosting.
Doing this takes some time — not because spreading a thin, imperfect layer of frosting on a tier is time-consuming (it’s not), but because you have to pop the crumb-coated tiers into the fridge for a an hour or so. You may think you can skip this step. You can’t. You’re making a wedding cake, for crying out loud — don’t skimp on such a simple step that makes a dramatic difference in how your cake will look. Read the crumb coat instructions in your book and follow them. Trust us.
Ending Up With An Upright Cake
To get your cake straight, you want every layer, and the top of each tier, to be as flat as possible. There’s nothing wrong with a slightly leaning cake, mind you. And if you do end up with a slightly off-kilter one, you position your cake so that the tippy side is less visible. But taking the time to get all components of the cake as flat as possible will be a big help. We managed to nail it (after a somewhat leaning practice cake); here’s how:
First: make sure you’re oven temperature is correct and steady. See “Know Your Oven” above.
Second: bake your layers one at a time. See “Other Invaluable Things We Learned” below.
Third: Level your baked layers. You can use a cake leveler, but word to the wise: Wilton’s Large Folding Cake Leveler didn’t work for us at all. The blade was too flimsy. So I did it by hand with a long, very sharp knife. It’s time consuming to meticulously level nine cake layers by hand, but you can nail this by checking your work with a carpenter’s level. If you really take the time to do this well, you’ll end up with flat tiers and a flat cake.
 (Months after this cake was history, we had much better results, albeit on a 10-inch cake, with the Kaiser Bakeware Patisserie One Wire Layered Cake Cutter. We also found an as-yet unreviewed, non-folding 12-inch wire leveler on Amazon called the “Fat Daddio’s 12” Cake Leveler Trimmer.” It looks similar to the leveler that did work for us, but having not tried it, we can’t speak to how it works.)
Some Other Invaluable Things We Learned:
Bake each layer one at a time. Lots of folks bake more than one layer in their oven at once. And if you have a very large oven, this may work for you. But we found that 1) it threw the baking times off, and 2) required opening the oven during baking to move the pans around, which made some of our practice layers fall.
This presented a problem for us: Our recipe called for us to mix one huge bowl of batter for all three layers of our tier at one time. It assumed we would mix the batter, divide it among three pans and then bake all three simultaneously. Difficulty is, you want to mix your batter and fill your cake pan right before you pop it in the oven. If you let it sit around, all sorts of science starts happening that you don’t want to happen too far in advance of baking.
So, if you want to bake your layers one at a time, but your recipe offers just one set of measures for multiple layers (assuming you will divide the mixed batter among several pans at once), you’ll have to do some math. We had to divide our recipe in three, then mix each layer separately. Here’s where your kitchen scale is invaluable, once again. To calculate the correct measures of ingredients for each layer, we weighed out every ingredient on our kitchen scale (in grams), then divided by three.
It’s a labor of love, people.
- Photo credit Kristoffer Triplaar
- Photo credit Kristoffer Triplaar
You don’t need a fancy kitchen or a beautiful oven to pull all this off — we have teeny, tiny urban kitchens. And you can use an expensive stand mixer or a basic electric hand mixer; we used both for different layers and found it didn’t make a difference — although the stand mixer was helpful for the frosting.
Finally, this is an all-hands-on-deck project. Enlist your friends! Other hands and eyes come in handy for flipping, eyeing whether the layers are flat and the tiers are straight. Shazia helped us construct our practice cake and Jenny made the finished product gorgeous with her talented eye for the right placement of the gum paste flowers.
If you’re still with us, you’re hard core — you’re totally going to rock this wedding cake. And if we can do it, you can, too! Good luck!

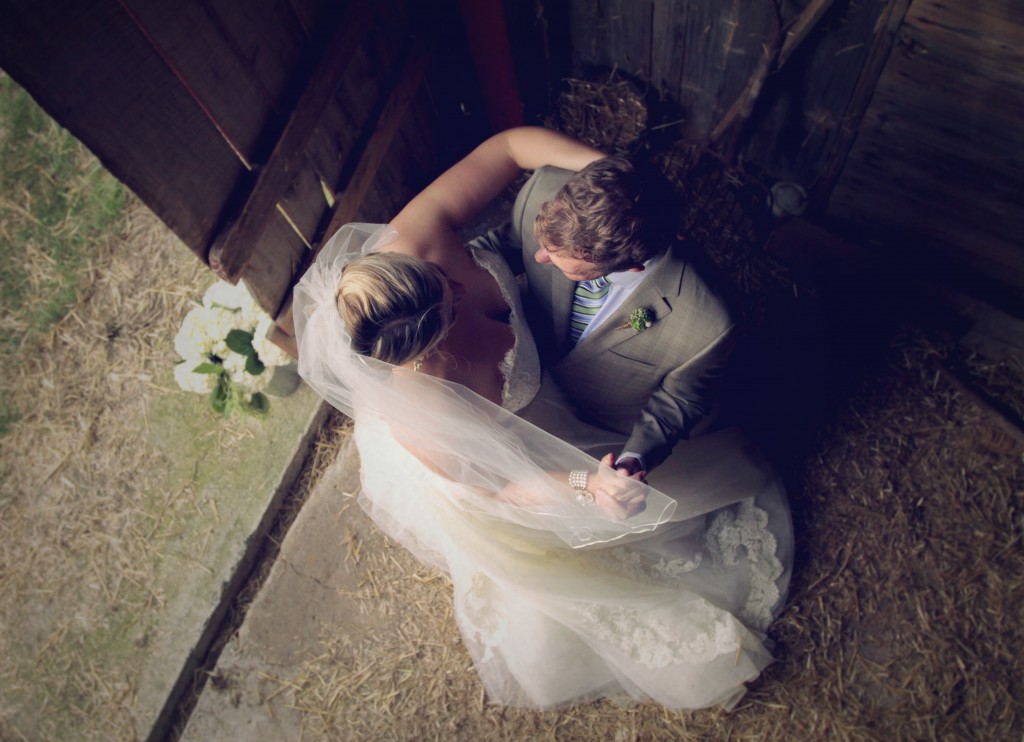 AMY: The best part about a wedding? The honeymoon. Yes, I get that it’s not technically part of the wedding, but let me tell you — after planning and executing one of the biggest events of your life, you’re gonna need a break.
 with great beaches … in October. We tossed around St. Lucia …
 Well, villa is a pretty good one, too. And butler. And all-inclusive — but only on the days you wanted it, which meant we wouldn’t stuff ourselves every day, or feel like we were losing money if we spent a day touring. Talk about paradise! It was something like 40 percent off, which was awesome.
 that is less than three weeks (really … read about it here and here and here.) Personally, I’ve never considered a vacation longer than a week. We stayed in Bali for two. It’s your honeymoon! Stretch out the time to relax and have fun as a couple.


